eSIM set up for iOS
Activating eSIM
Before starting, please make sure that:
1. You activate the eSIM on the day of your departure. The date of eSIM activation will start on your activation date.
2. Your device is connected to the internet or a stable WiFi network, preferably not a satellite connection (found on ships or airplanes) or free WiFis (like in airports or cafes) , as these might not work.
3. Please note that the actual text or screens may be different depending on the iOS version and the device.
4. Most of our eSIMs require enabling roaming. To avoid mistakes in using roaming data and bill shock from your primary SIM, we recommend you contact your network provider such as AIS, dtac, or True to disable roaming.
Step 1
Go to Settings > Cellular > Add an eSIM.
in some devices it will be Settings > Mobile Data > Add Cellular Plan.


Step 2
Select "Use QR Code"
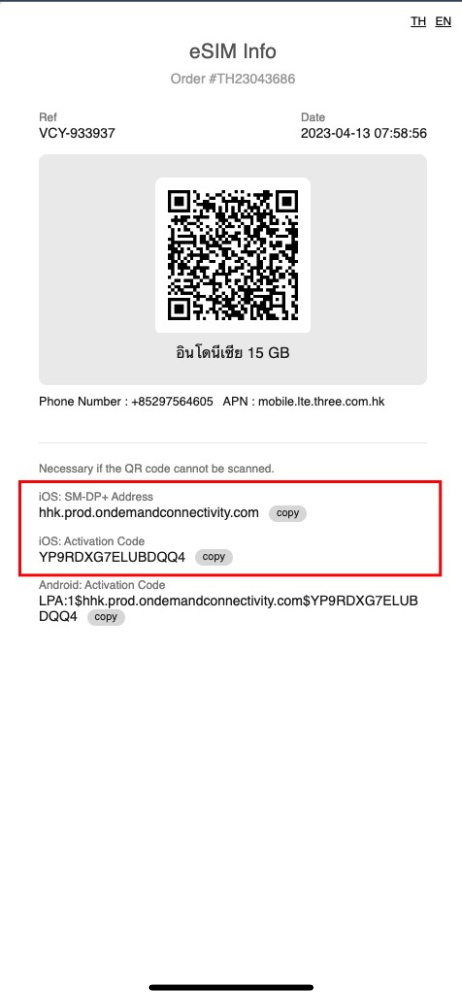
QR code is available in your account at My eSIM menu.

Step 3
Scan QR Code
If you do not have another phone or device to scan, select "Enter Details Manually"

Step 3.1 : Skip this step if you can scan QR code.
Input iOS: SM-DP+ Address and iOS: Activation Code
These information provided in your account at My eSIM menu.

Step 4
After scanning or manual input activation code, click on "Continue"
Please note that this process may take a few minutes. Please wait and do not close it.

Step 5
Cellular Setup Complete
You can click "Done" to complete adding eSIM

Step 6
Cellular Plan Labels
New plan will be added at last one on the list. If you does not want to change Cellular Plan Labels, skip to step 7.

Step 6.1
Click on Cellular Plan Label, and set a custom label for the plan.
We recommend you change it to "vacay.date" eg. "vacay.160423" or as easy as you can recognise.


Step 7
Select "Primary" as your Default Line
or simply tap "Continue" without selecting any

Step 8
Select "Primary" for iMessage, FaceTime and Apple ID
or simply tap "Continue" without selecting any

Step 9
Select your default line for cellular data
We recommend you to select "Primary" if you install eSIM on your origin country.


Step 10
Congratulation
Now your travel eSIM is added to your SIM profile successfully.
Starting using eSIM
Please do this step once you arrive the destination country.
Step 11
Go to Settings > Cellular (or Mobile Data) > Find your Newly added plan > Tab the plan
Normally would be the last one on the list or you can find the name that you set up in step 6 eg. "vacay.160423"

Step 12
enable "Turn On This Line" and enable "Data Roaming"
Then click "Cellular" on top left to go back to Cellular Setting.

Step 13
Click on "Cellular Data"
on top of the screen, then choose the plan name that you set up in step 6 eg. "vacay.160423"

Step 14
Please wait for 1-5 minutes.
Then test if you can access the internet. If you are unable to do so, please review all the steps again or restart your device.